A lot of people in the world of software development use Git in some form or another. It is an amazing version control system that is used in many different projects, especially in the open source world. Many people already use Git with great success, but not everyone knows how to use it, and for beginners, it can be really confusing. That’s why we wanted to write this guide for you. Here, we will explain some of the more Git commands basics for you in this guide.
What is Git?
Git (version control system) was created by Linus Torvalds, the creator of Linux in 2005. You can use it to track any file changes, but it is most commonly used for software development.
Why to use Git?
- File Tracking: Developers can view and restore files from previous versions, as well as see what has changed in the new software version.
- Collaborate: Modifications made by multiple developers can easily be combined. You can efficiently work on multiple features simultaneously by using branches.
Git can be installed on Windows and macOS as well as Linux.
You can save the entire database in your local repository if you are working alone. If you are working with other developers, however, the project should be saved and shared in a remote repository (or master repositories), which is hosted on Github.
Git is a distributed version control system (VCS) that users do not need to access the master repository in order to make modifications. They can copy the master repository to their own machine and then modify the files from there without having to connect to the network.
Users of centralized VCS such as SVN and CVS must connect to the master repository in order to make changes. Git is the best choice for flexible work.
Areas in Git where code lives

A Git project consists of three components:
Repository:
A repository (or repo) is the “container”, which tracks changes to project files. It contains all commits, which are snapshots of all files in your project at one point in time. The Git log allows you to view the commit history.
Working tree
Your current files are the working tree or working directory. A working tree is a file system that allows you to view and modify files.
Index or Staging Area
The index (or staging area) is where commits are made. The index compares files in the working directory to files in the repo. The index marks a file as modified when you make a change to the working tree before it is committed.
Git basic workflow.
The basic workflow for git files is as follows
- Modify files in the work tree.
- Stage the changes that you would like to be included in the next commit.
- Commit your changes. (Committing will extract the files from the index, and save them as a snapshot in a repository.
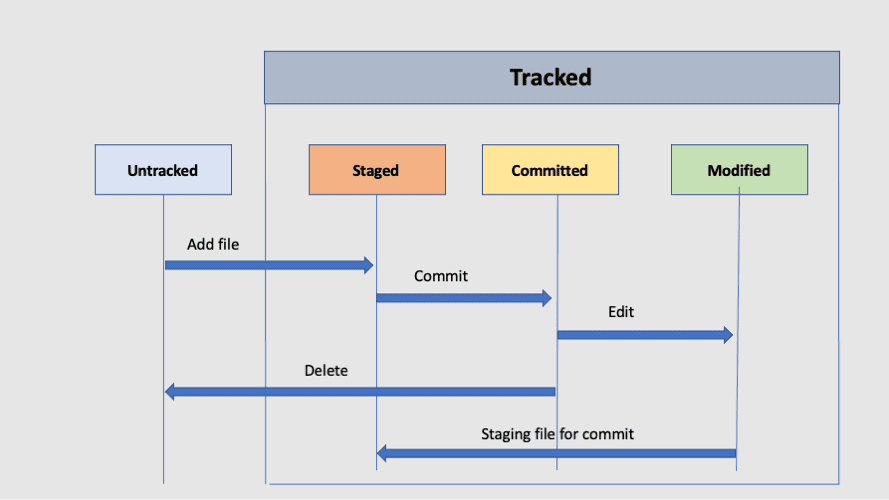
States of Files in Git
There are three possible file states, as you can see from the Git workflow.
- Modified
- Staged
- Committed
The file you are editing will be saved to the working tree and will be in modified state.Now, if you want to include the changes in your next commit, you must stage them. After you have finished staging all files you can commit them with a message explaining what you did. Now, you can safely store/push the modified files in the remote repo.
Git Commands Basics For Creating Identity
Git needs a username to be associated with the commits. As such, you should create an identity through this command:
git config --global user.name "name"
git config --global user.email "email address"
Creating A Repository
Once you’re in the desired directory where you want to create git repo, run the git init command, so Git can track the changes made to the files in that directory. Git Init will create a .git subdirectory within the local directory. This subdirectory is the one responsible for storing the snapshot of your changes.
git init
Git Commands Clone A Repository
You can copy the remote repository to your own machine and make changes from there if you are working on a collaborative project.Following git commands clone the remote repository.
git clone <address of remote repository>
Indexing and Committing
Let’s suppose you make some changes to the file home.java. You will need to move the file to the staging area before you commit the changes. Run the following command.We can still make any changes in this stage if necessary.
Git add home.java
Next, use following command to check if all of your changes have been staged.
git status
Next, save the file.
git commit-m "Message to go along with the commit"
After that, you can type the git status command once more. If the command says there is nothing to commit it means that all modifications have been saved. This command can also be used to modify the most recent commit message.
git commit --amend-m "updated message"
The message will be updated after you save and exit.
Git Branches
You might consider branching out if you’re working on a new feature. This will ensure that the master branch (main line) is not affected by your new feature.
After the branch’s project is verified to be functioning, it can be merged into the master branch. Those changes will also be applied to the master branch. In the next section, we’ll discuss merging.
This command will show you the list of branches in your local repository.
git branch
You can add the name of the branch to create a new one.
git branch <branch name>
Although you have created a branch, you are still within the master branch. You must switch to the new branch to modify it.
git checkout
Now we can commit and add the changes.
It is common to take out old branches that have been merged but are no longer in development.
git branch –d <branch name>
The command above will not allow you to delete unmerged branches. Git is warning that if the master branch isn’t merged, it won’t contain the changes you made in the branch.
This command will force you to delete any unmerged branches.
git branch –D <branch name>
Git Commands Push and Merge
Merging is a way to integrate changes from different branch. So, let’s say you developed a new feature in a branch, and now you need to merge that branch with the master branch so the master branch can receive the changes from the former branch.
Firstly, we will switch to the master branch by running the git checkout command. After that, execute the
git merge <branch name>
Once the changes are committed and we can push the commits to the remote repository using following command.
However, before pushing the commits, we need to see that the command line is pointing to the right remote repository address. Check it through this command:
git remote -v
If it’s not pointing to the correct address, we can change it by:
git remote set-url origin <remote repository address>
Following git commands push the commits to the remote repository:
git push origin master
Git Commands To Pull And Fetch
Consider following scenario.Suppose you cloned a remote repository and are working on a local branch. During this process, your teammates pushed their branches and made new changes to the remote repository.
Now, if you want to update your working directory, so that latest changes made by your teammates are reflected.For this pull and fetch can come in handy.
Git Fetch: This git command will download all remote branches and won’t affect anything in your local repository. It is a safe way to update your working directory.We can use following git commands to pull.
git fetch <remote repository address>
Git Pull: This git command to pull the repository will download the content of the remote repository and merges it with the current branch you’re working on. As a result, some conflicts might occur which need to be resolved.We can use following git commands to pull.
git pull <remote repository address>
Merge vs. Rebase
Both merging and rebasing can be used to incorporate changes from a branch to the master branch. However, they’re not the same.
Merging: While merging would save all the commits from the branch in the form of a new commit,
Rebasing: Whereas, rebasing would move the commits to the top of the master branch.
Each option has its own advantages: merging won’t affect the log history, and rebasing will make the log history more linear.
Some Other Git Commands Basics
Lastly, in this git commands tutorials, we will discuss Reset, Checkout, and Revert which are super helpful and important to know.
- Git reset — can bring you back to one of the older commits. However, it’ll delete all the commits after that specific commit.
- Git revert — creates a new commit by inverting the commit you want to undo. As such, you can undo some commits without modifying the log history.
Final Words
In this post, we hope you have found a clear and helpful way to learn the git commands basics. There are a lot of other resources that you can use to learn more.
If you have any questions about any other git commands, please join our newsletter and and ask a question! We’re happy to help you learn more.
Thanks for reading, and happy coding!